


But practice makes perfection! Today, i want to do a basic tutorial, for how i try to do the basic black smokey eyes. Everything i use in this tutorial are basic necessities, and i think any makeup collector would have something similar. The purpose of this is to allow everyone a chance to replicate this tutorial if they chose to do so. You really don't need anything fancy!
This tutorial is best suitable for people
- with small eyelids
- clubbing or any fancy evening events
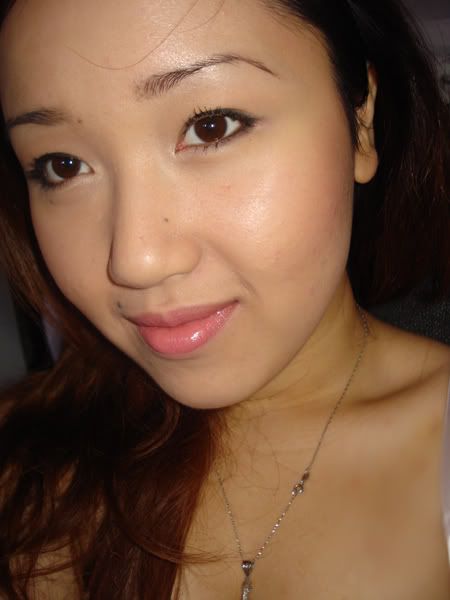
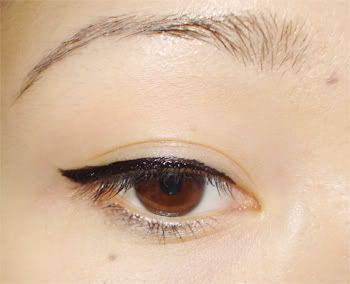
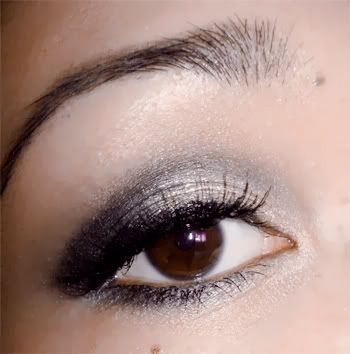
This is the finish look:

For this tutorial , this is everything that i used:
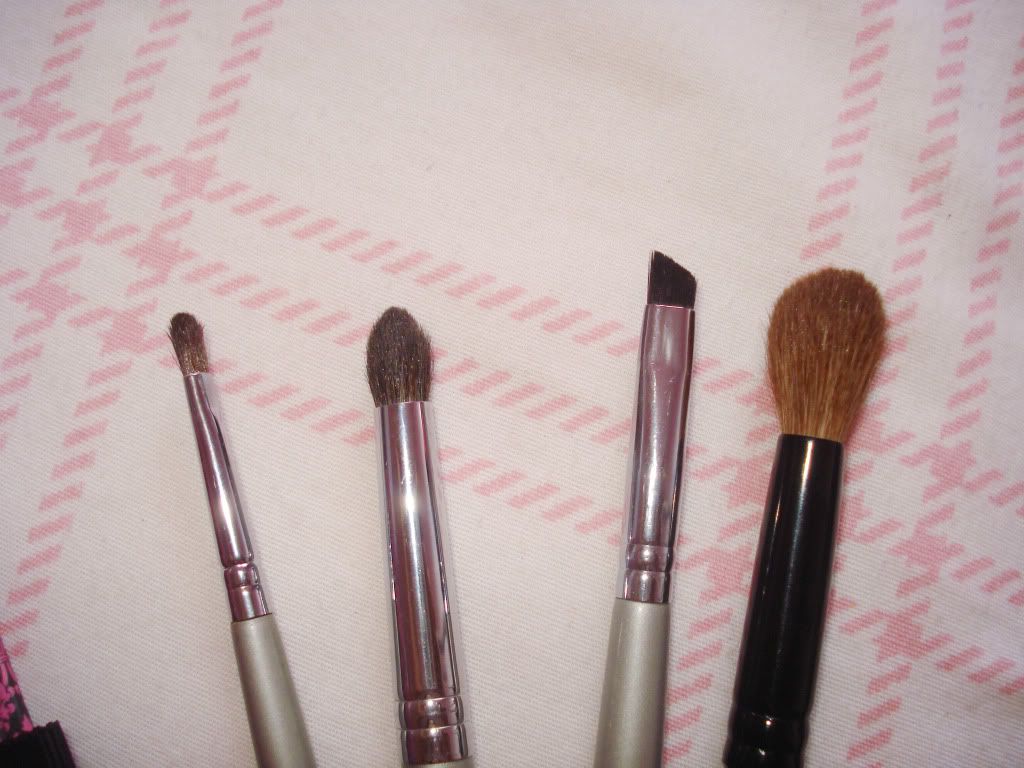
4 brushes - left to right
1. small shader brush ( u can use any larger shader brush, i just use this because the palette is small and i need a small brush)
2. crease blending brush
3. angled brow brush (perferrably it to be stiff & thick)
4. large blending brush ( to blend the harsh edges)
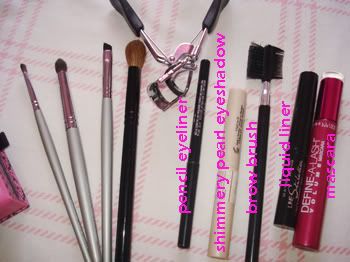
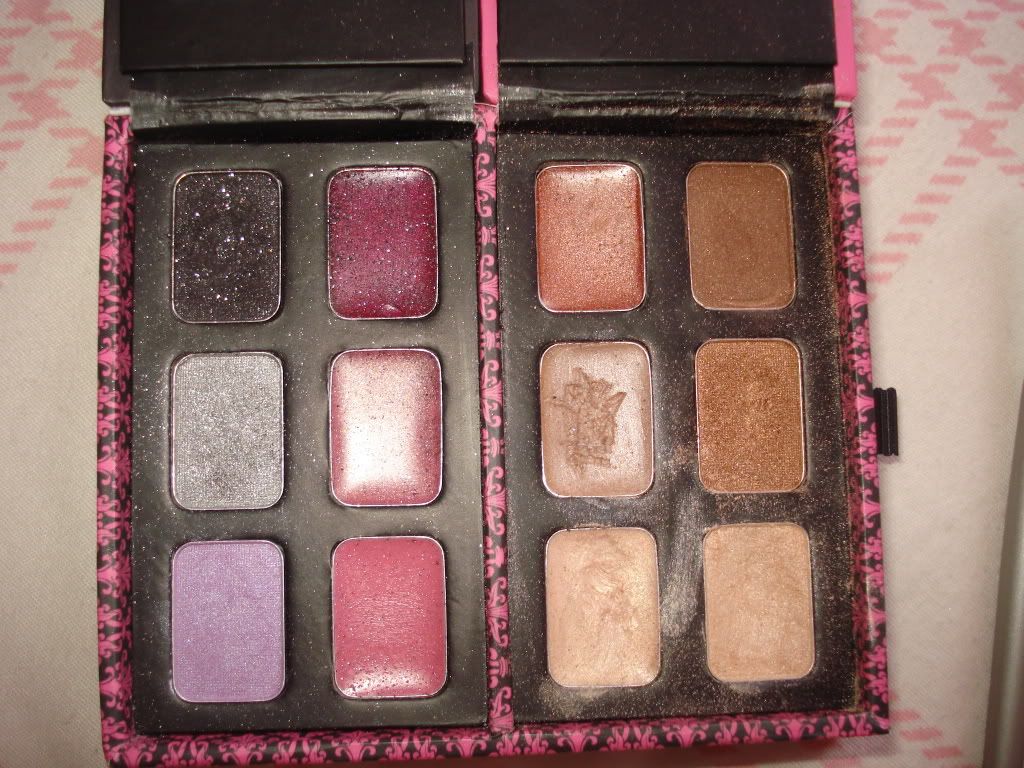
i used the shimmery pearl eyeshadow in the stick (above ^) & the champagne colour in this palette(below) on top of it as well as the black eyeshadow in this palette
okay, so let's get started
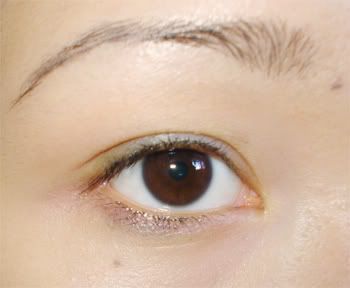
This is my naked eye, with some minor makeup residue remaining
Step 1
:Apply eye liner
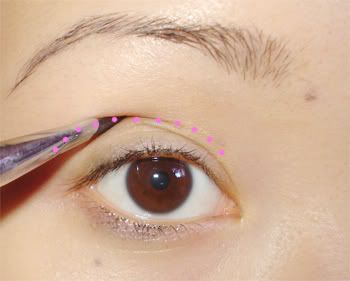
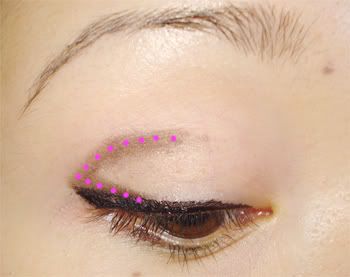
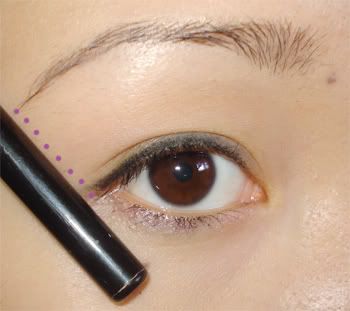 i use the pencil eyeliner and lined my eyes. For this part, you don't have to make it perfect. I also like to wing my liner at this point as well. I find that by doing this it helps me to create the perfect "smokey" eye shape later when i start blending in the crease. So i just take my pencil and line the end of my eye to the end of my eyebrows. This is the angle i want to "wing" my liner. Often times, when i don't do this, my eyes look droopy, because i tend to draw my liner too far out.
Step 2
:Wing your Liner
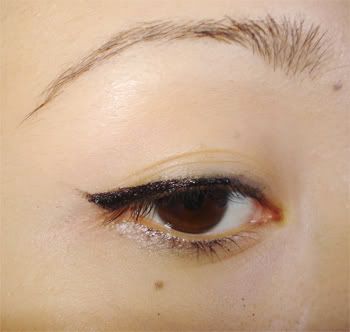
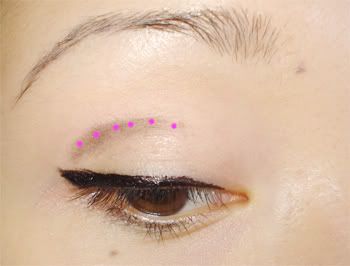
 I use liquid eyeliner to wing my liner, because it's quick(no need to sharpen pencil) precise & no need to tug on the eyes! Using the LIQUID eyeliner, i start right at the outer corner of the eye, and flick directly up in the angle that I've already determined earlier. You should have something like this.
 Now you may have noticed a sharp and awkward bent in your eyeliner. So you just want to smooth it out, but filling in the corner. & you should get something like this. Optional : After you've done all that, just go over your entire eye again with the eyeliner & your eye should look something like this.
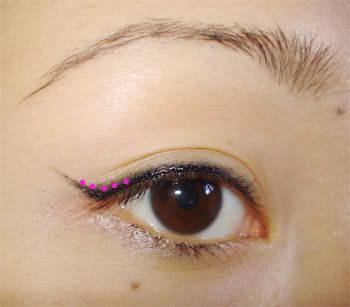
Step 3
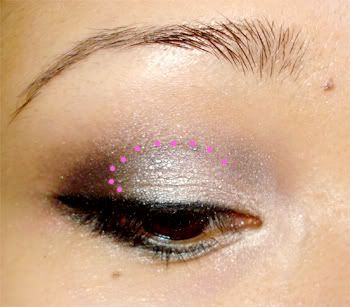
:Finding your Crease
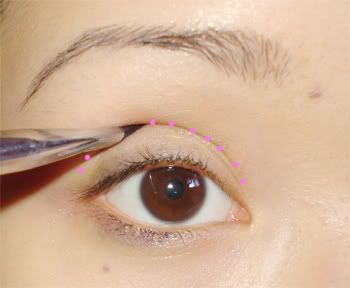
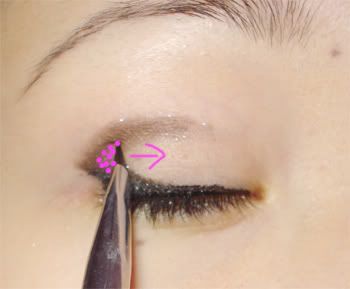
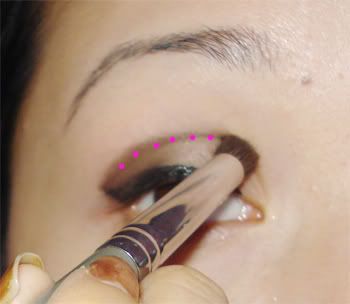
First, to make it easier you want to raise your eyebrow as high as you can, then using the Angled Eyebrow Brush you will need to sort of poke it into the hallow areas above my eyes. (raising the eyebrows make the crease more visible) This is where your crease is. You just want to use that brush and sort of poke it around your eye so you get an idea of where your crease is. Once you've done that, pick up some black eyeshadow and lightly trace (by stroking) your crease using the same "poking method". I would say this is the hardest part. In the pictures, i exaggerated the poking to make my point. You don't want to poke it hard.
Step 4
:Trace your Crease
 Trace your liner to approximately the middle of your eye. Do not connect the end of the line to your eyeliner. The eyeliner that we have previous drawn in, guides how far i should trace/draw my crease. It should look something like this.
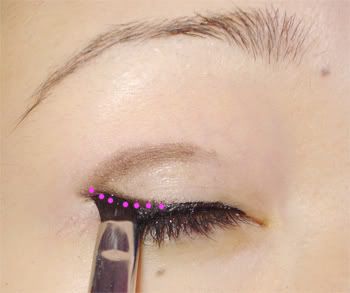
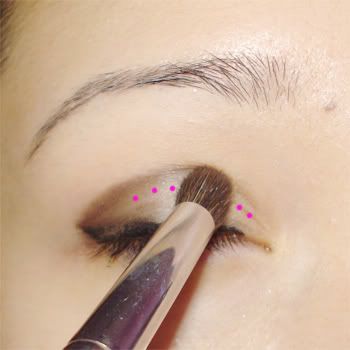
Now, using the same angled brush you want to stroke the eyeshadow slightly above your eyeliner and line it to the "crease line" that you have just drawn. You should have something like this in the end.
Now, you just want to hold the brush vertically and brush towards the right. This just blends out the black, and soften the "V" shape & it should look like this.
Step 5
: Blend out the Eyeshadow
Using the crease blending brush now, you want to brush the black eyeshadow towards the inner corner of the eye & just slightly blend out the eyeshadow so the edges aren't so harsh. Smooth anything that you think is necessary. Do this in windshield swiping motion
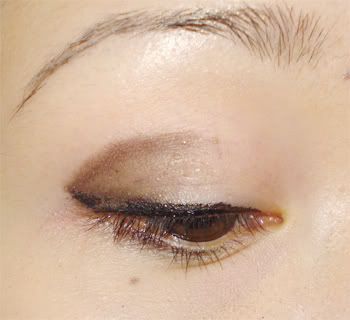
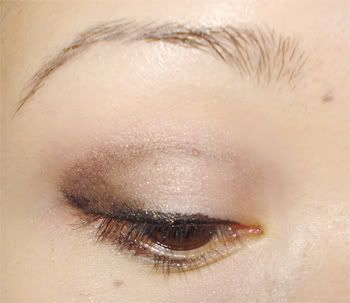 This is how it may look in the end
Step 6
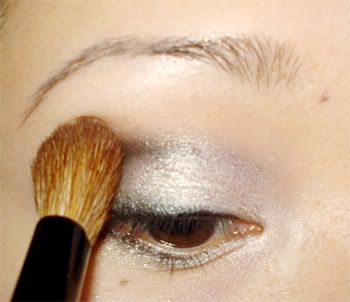
: Applying White Shadow
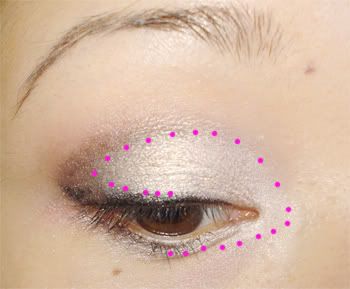 Now that you have everything basically "traced" out for you, you can easily apply the white eyeshadow. i apply it to the lid, and then the inner corner, and lower lash line. I used a shimmery pearl eyeshadow in a stick form with the champagne eyeshadow(from the palette) on top. You can use any colour. Shimmery eyeshadows compliment matte black eyeshadow very well. It gives you this extra "pop".
Step 7
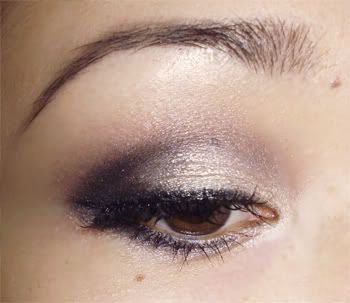
: Darken and Perfect the crease
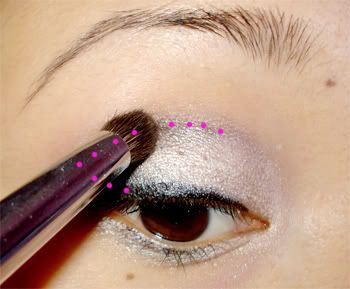 Go back in with the crease blending brush and darken the crease (with many layers of black eyeshadows! LOL) to your desire. All the previous blending has probably washed it away.
Step 8
: Blend out harsh edges
 If necessary, just use a big blending brush and brush the edges to smooth out the harsh edges
Just re-apply your eyeliner, (water line) apply false lashes and your done!
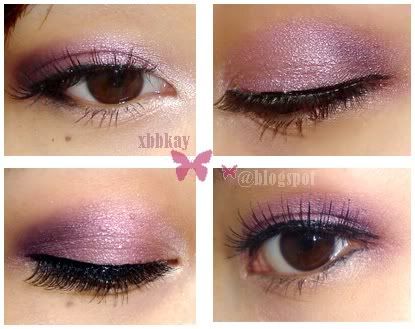
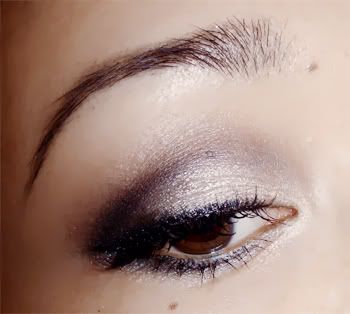
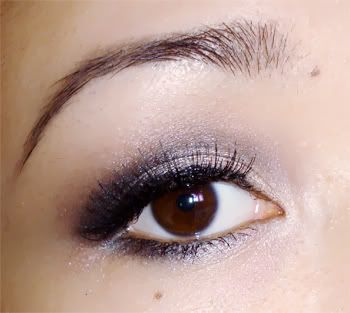
FINISH
 (without false lashes) False Lashes MAKE ALL THE DIFFERENCE!
With False Lashes:
I hope this helped! I find it sooo much easier using the angled brow brush then using a crease brush only. Its much easier for me. Use any colour your like. Good luck and have fun~
P.S. i'm so surprised how many followers i've gained. I'd like to say Hello to all of you and thanks for following! Don't be shy to leave a comment. I'd love to hear from you guys!
33 comments:
I tried this tutorial and it worked so nicely!! Thanks so much <3 I always had problems with smokey eyes because it ends up being too dark... haha. Thanks for the tutorial!
Awesome! Thank you soo much for this tutorial! I wanted to achieve a smokey eyes for my cousin's wedding but I've always ran away from black shadows lol. Will def. try it! ;)
Love it =)
That looks great ) like it, very simple tutorial! ♥
Wow, this tutorial is so articulate! Been practicing the smokey eye and this will help me A LOT. :)
This is a great tutorial!! thanks! :)
Thank you so much for the great tutorial..Will try this step..I always having problem wing my eyeliner..
Very pretty and simple smokey eye! ^_^
wow that look is really pretty and sophisticated ;)
lovely blog :)
i followedd
love from sydney,
tezza :)
Great tutorial! :) I'm also gonna try this. Thank you so much for sharing!
oOo This is such a good tutorial ! :D And I absolutely love your eyes~!
& you shouldn't be surprised by how many followers you have, because you have a really great blog! I really love it :) And you're a really sweet person too <3
this is very helpful!!! thanks!
Great tutorial!
This is great!! I have the same problem as you did I will have to try this!! Thanks for sharing Anh! =) It looks gorgeous!
Great tutorial, the step by step photos are so helpful.
By the way, what's the name of the song that's currently playing on your blog? x
great tutorial! Thank you!
WOW I love this!!! I def want to try this out, as I still don't know how to do a good smokey eye!
What is the brand of the palette and the shadow stick? Thanks :)
Love this!!! I might try this out soon =P
wow... so pretty! i'm going to try this look.
@Peonies & lilies - i'm not sure which song you are specifically asking about, because i have a playlist that is on random. I'm assuming that it's the chinese song? that song is from a tawian drama called "I Do". the singer is Fish Leong & the song title is - Shu Yu. It's a lovely song isn't it?? i've been addicted to it for the longest time!
@Sophia - the shimmery pearl/white eyeshadow stick is from GOSH called "Love that Beige" & the palette is from Urban Decay, called " Nice and Naughty" i believe.
Great Tutorial! Very simple yet fab! =)
Btw, as u know i had troubles w/ my blog feed lately, and its now been fixed.
Please UNfollow me then FOLLOW me again so that my posts will now be visible in ur dashboard.
Please do the same w/ your blogroll. Thank you so much sissy! =)
Awesome tutorial. Thank you for this. My bf always wants me to do smokey.. I have yet to try/master it XD
doing the crease is always the hardest for me! u did it amazingly effortless and so beautiful!
xoxo elle
I love this so much! I really don't know how to do smokey look. I'll try to do this when I get the chance. ^^
What an absolutely FAB tutorial! You did a great job, I envy your skills!!! Thanks for taking the time to do this...I need to take notes! ;)
^Oh my I know a few of these people (arsyparsy through her sister - did you know they are both canadian??), susie, and Dana. Anyway how you doin princess! It is f-ing baking hot omgah I'm melting. I wonder how people's makeup stay on.
I liked your photoshoot post from a month back alot <3 Very fancy! Quite a pink dress you ahd on there and it looked great. Sometimes prissy works best.
-me
I really like how you put so much effort into explaining things with step by step pictures. It gets tiring to do them, but it ends up helping a lot! Black and white makeup sometimes just has the most awesome effect.
Sooo helpful!
яσѕαℓуи
LynSire.blogspot.com
Niiice. For some reason your eye doesn't look Asian there ! X-D Very pretty.
"raising the eyebrows make the crease more visible" really helped me!!
No other makeup gurus have given that tip, but I found it extremely helpful in finding those stubborn creases!
xO
@Anonymous: i'm replying wayyy too late, but i'm glad that i was of a help! goodluck!
what kind of camera are you using? :)
Post a Comment
thank you for taking the time to leave a comment. i love to read each and everyone of them.
Any comments/question regarding this post, will be replied in this post. Otherwise, I usually try to get back to you on your blog. Im quite slow sometimes, so please forgive me. hehe. <3